Google Sheets DB Tutorial
The first part (the Google Sheets part) of this tutorial is first a restatement, then an extension, of Martin Hawksey’s Google Sheets as a Database article, with my own insights interjected. I include commentary from my experiences building a “community” homepage based on this idea. I’ve written this article to shed some light on what’s going on in Martin’s tutorial.
The Google Sheets Part
First, go to Google Sheets, and create a new sheet. Then in the menu, click Tools > Script editor... to launch the IDE. For starters, let’s copy and paste Martin Hawksey’s Apps Script snippet into the editor. Here it is for convenience: gist
The first part of Martin’s tutorial tells you to run the function setup, reproduced here:
function setup() {
    var doc = SpreadsheetApp.getActiveSpreadsheet();
    SCRIPT_PROP.setProperty("key", doc.getId());
}
It’d be nice to know what id does first! Line 1 of the function grabs what’s called the “Active Spreadsheet”, a.k.a. the spreadsheet that you opened this script editor through. (You may notice that when you try to close your spreadsheet tab, the script editor leaves along with it). So doc is an object representing your spreadsheet. When you don’t have the spreadsheet open, getActiveSpreadsheet will error. By setting a script property that we call “key”, we can remember the id of our spreadsheet so we can retrieve it whenever we want. Now that we know what’s going on… in the menu, select Run > setup.
Google may tell you “Authorization required / This app needs authorization to run”. That’s fine, hit “Continue”. Your script needs access to (1) View and manage your spreadsheets and (2) View and manage data associated with the application. Allow both. Now setup has run, and if you’d like, select File > Project properties, then select the Script properties tab. There’s the key that we just set! FYI, it’s the same id that appears at the end of the URL of your spreadsheet. So, we could have done this manually by inspecting the URL of our spreadsheet and entering the id in this Script properties tab. Either way, the script and the sheet are now together forever.
Time to deploy your script: select Publish > Deploy as web app.... Choose to execute the app as yourself, and make sure to grant everyone access, like this:
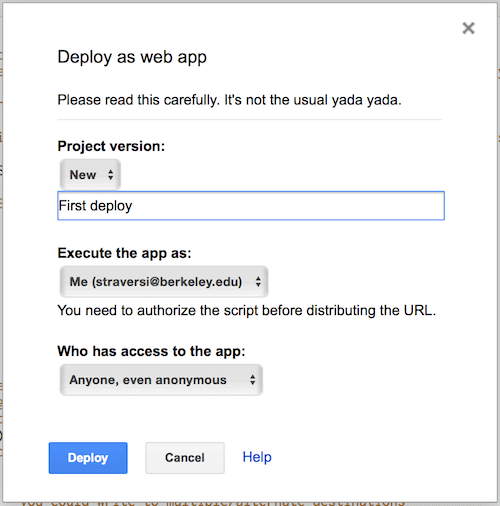
Congrats. Save the “Current web app URL” that you are given, we’ll use it in a second. Don’t worry, you can recover it whenever you want by going back to Publish > Deploy as web app....
In Action
Let’s make something happen. Go to your Google Sheet, and add “Timestamp” to A1 and “Name” to B1; these will be our example headers. I’ve written two scripts, one jQuery and one plain JavaScript for you to play around with posting to the sheet. Take your pick, and try them out:
Updates, and Handling GETs
Notice something? The current App Script code that we have attached to the spreadsheet doesn’t actually handle GETs in a useful way. Let’s fix that! We’ll divvy up handleResponse into two cases.
App Script gives us these reserved functions called doGet and doPost. When someone accesses our script with a GET or a POST, the appropriate function is called. We’ll define two new functions, handleGet(e) and handlePost(e) (or, feel free to place your response code inside doGet and doPost themselves).
First notice that our GET and POST will end up sharing some code: we need to keep these snippets from handleResponse(e) at the beginning and end of our new definitions:
var doc = SpreadsheetApp.openById(SCRIPT_PROP.getProperty("key"));
var sheet = doc.getSheetByName(POST_SHEET_NAME);return ContentService
.createTextOutput(JSON.stringify(resultObject))
.setMimeType(ContentService.MimeType.JSON);You may want to abstract those, as they’ll be the same for each type of response. In between, we’ll do our GET or POST work. I’ve modified the returned ContentService to return resultObject, which we can set to be whatever we want in both our GET and POST responses.
Note: If you separate your GET and POST handling, you should remember to move the LockService portions into your POST handler. We don’t want to be unnecessarily restricting read operations. Furthermore, App Script has changed since the script we began with was written. LockService.getPublicLock is now LockService.getScriptLock. Be sure to reflect this change in your code. For more on other types of locks, see Class LockService.
Safari, And How to Trick It
Our “database” operations should be successful so far. That is, except for this odd corner case: Safari.
What’s the problem? When we try to do our simple post, we get these errors in the console:
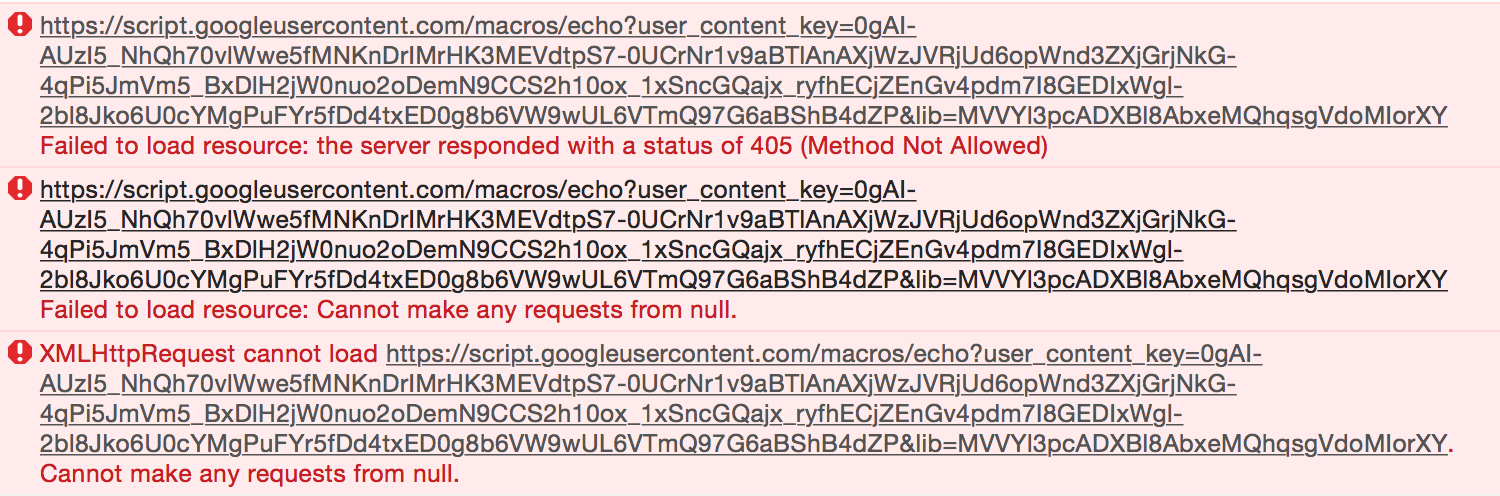
Aha, but if I check our spreadsheet database, I see that the POST still successfully got the correct data to the sheet! So it would seem that the problem here is that Safari can tell Google stuff, but Google can’t tell Safari stuff back. Which causes problems: (a) GETs are useless now, and (b) we can’t tell the difference between a successful and unsuccessful POST, because we can’t get our result key back.
The Fix
To make a long story short, what we have here is a problem with Cross-Origin Resource Sharing (CORS). Safari won’t accept Google’s response unless it has a certain header specifying Access-Control-Allow-Origin: *. This is a result of Safari adhering to W3C spec very closely. To fix this, we’ll have someone else make our requests for us. If we append http://crossorigin.me/ to the beginning of our request URL (https://script.google.com/macros/s/AKfycb…), the folks over at crossorigin will make a nice request from a place that doesn’t care so much about CORS for us. We then receive the reply as Google sent it. ◼